Hi Guys,
This is very simple POC by which we can generate Kaptcha Code in ADF 12c.
Don't be very serious just follow the steps and at the end you will find the correct Apps.


For setting the lay outing and color of kaptcha Image you add some LOC in your web.xml file like-
This is very simple POC by which we can generate Kaptcha Code in ADF 12c.
Don't be very serious just follow the steps and at the end you will find the correct Apps.
CAPTCHA means - Completely Automated Public Turing test to tell Computers and Humans Apart.
For creating Kaptcha Code, we will follow very simple few steps:
S1- Create a Fusion Web Application from the Jdev12c.
S2- Create a KaptchaDemo.jsf page under the below project structure -


S3- Generate KaptchaDemo.java class and create one RichInputText and one method like :
//Binding of inputText to get entered value
private RichInputText entrCaptchaCode;
public void setEntrCaptchaCode(RichInputText entrCaptchaCode) {
this.entrCaptchaCode = entrCaptchaCode;
}
public RichInputText getEntrCaptchaCode() {
return entrCaptchaCode;
}
/**Method to check whether entered value is correct or not
* * @param actionEvent */
public void readCaptchCode(ActionEvent actionEvent) {
FacesContext fctx = FacesContext.getCurrentInstance();
ExternalContext ectx = fctx.getExternalContext();
HttpServletRequest request = (HttpServletRequest) ectx.getRequest();
//KAPTCHA_SESSION_KEY- The value for the kaptcha is generated and is put into the HttpSession.
//This is the key value for that item in the session.
String kaptchaValExpected = (String)request.getSession().getAttribute(com.google.code.kaptcha.Constants.KAPTCHA_SESSION_KEY);
//Get entered value of captcha using inputText binding
String kaptchaValRcvd = entrCaptchaCode.getValue().toString();
System.out.println("Entered Value-" + kaptchaValRcvd + " Expected Value-" + kaptchaValExpected);
if (kaptchaValRcvd == null || !kaptchaValRcvd.equalsIgnoreCase(kaptchaValExpected)) {
FacesMessage errMsg = new FacesMessage("Entered Value Is Not Correct");
errMsg.setDetail("Incorrect captcha value");
errMsg.setSeverity(FacesMessage.SEVERITY_ERROR);
fctx.addMessage(entrCaptchaCode.getClientId(), errMsg);
} else {
FacesMessage errMsg = new FacesMessage("Correct Value");
errMsg.setDetail("Hello this is the right guess");
errMsg.setSeverity(FacesMessage.SEVERITY_INFO);
fctx.addMessage(entrCaptchaCode.getClientId(), errMsg);
}
}
bind entrCaptchaCode to the textbox in the .jsf page
S4- Add Kaptcha reference to web.xml file
<servlet>
S5- Download Kaptcha 2.3.2 jar file and add into the class path as:

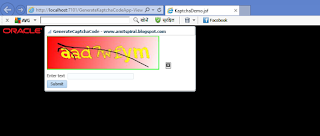
S6- Now run the KaptchaDemo.jsf page and you will find the below Output -

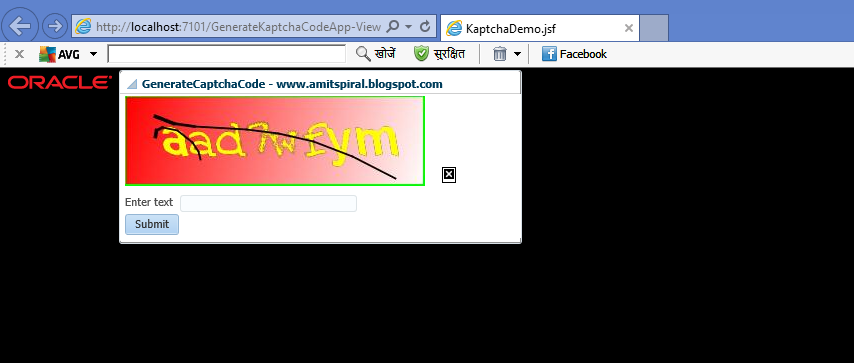
S7- Now to change captcha image, add partialSubmit=false in the link and set partial trigger property on af:image so you will get the below output.

S8- Here basic Kaptcha implementation is done and you can take a small break now :)
For setting the lay outing and color of kaptcha Image you add some LOC in your web.xml file like-
<init-param>
<param-name>kaptcha.border</param-name>
<param-value>yes</param-value>
</init-param>
<init-param>
<param-name>kaptcha.border.color</param-name>
<param-value>green</param-value>
</init-param>
<init-param>
<param-name>kaptcha.border.thickness</param-name>
<param-value>2</param-value>
</init-param>
<init-param>
<param-name>kaptcha.image.width</param-name>
<param-value>300</param-value>
</init-param>
<init-param>
<param-name>kaptcha.image.height</param-name>
<param-value>90</param-value>
</init-param>
<init-param>
<param-name>kaptcha.textproducer.font.size</param-name>
<param-value>50</param-value>
</init-param>
<init-param>
<param-name>kaptcha.textproducer.font.color</param-name>
<param-value>yellow</param-value>
</init-param>
<init-param>
<param-name>kaptcha.background.clear.from</param-name>
<param-value>red</param-value>
</init-param>
<init-param>
<param-name>kaptcha.textproducer.char.length</param-name>
<param-value>8</param-value>
</init-param>
here you can see advanced kaptcha code or you can customize the Image as per the requirement.
S9- you guys can download the Application from the below url :-
Thank you very much guys to hearing me :)


No comments:
Post a Comment